75A2 Restoration
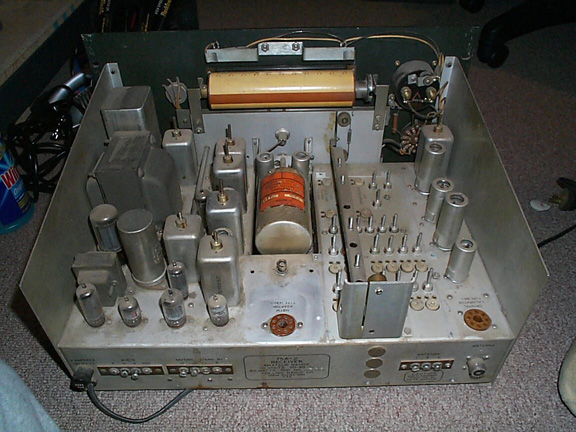
Here's what I started with:

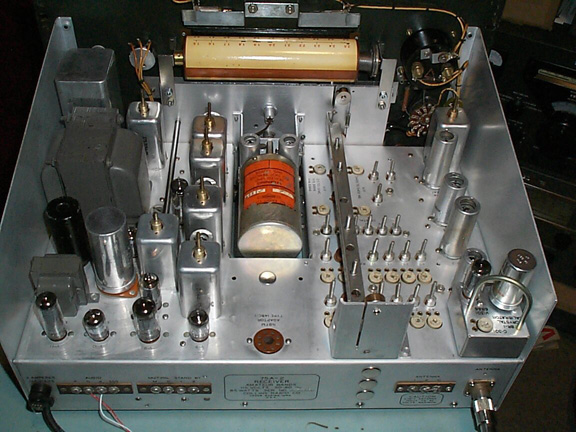
And here's the finished receiver all ready to go back into its case (RF cover not installed in pics).

Several people have asked how I did this, so here's the inside scoop....
First, with any serious restoration, you have to strip it down! You simply can not get into all the crooks and crannies otherwise. You can always tell the difference between a mint piece of original equipment and a restoration by the presence of dirt in hard to reach places. I try to make my restorations look like mint originals! Stripping everything down also allows you to check everything very thoroughly. The last thing I want to do is get it all back together again and find out that I missed something and have to tear into it again.
So first thing is to strip it down. Here's how far I took this receiver:

All the iron is removed and I usually repaint it. A dremmel tool with a small wire brush attachment is ideal for removing any rust from the transformers as you prepare them for painting. For this particular receiver I simply cleaned the transformers as they were not rusty. I did however apply a little touch up. You have to un-lace the transformer wiring underneath (draw a diagram before you do this to remember where everything goes). The pigtails are usually quite long so I snip the wires at the wiring points (tube sockets). I then redress the wires and clean up the wiring points. A solder sucker is essential, remove all traces of the old wire and solder from the tube socket pins.
All the IF cans were removed. They are simply held in place with 2 nuts.
The slug rack is removed and stripped to individual piece parts. After cleaning, the moving parts are lubed with synthetic grease.
The PTO and tuning gears are removed and dismantled. I test and calibrate the PTO external to the receiver - I could write a couple of pages on this alone but I'll save that for later. Calibration is within 0.5 Kc across the whole band when I'm done. There are a couple of paper caps in the PTO and one failed on me while I was calibrating the PTO! Good idea to replace these - I did. I mark the gears before disassembly to make sure they go back together correctly. permanent marker drawn across the mating surfaces works great.
In most cases I replace the chassis hardware (screws) with new stainless ones. I buy these by the box full!
Once all the hardware has been removed, you can go to work...
All the metal pieces that have been removed are cleaned with GoJo hand cleaner (the kind without pumice). Get plenty on and work it in with a rag and old toothbrush. Let it sit for 5 to 10 mins. If it is particularly dirty, do it twice. Once it looks good and clean. Hose it off and clean with a little dish soap and water. That's it for the metal - I do not polish anything, it is just very clean, just the way it was when it was assembled new!
I also use GoJo on the chassis too but only when I can be sure it will not get into the electronics. I have never hosed down a radio as some people prescribe. I usually use only Windex on the chassis. I work it into the crooks and crannies with Q-tips and an old toothbrush. I cut up old T-shirts into little squares and use them as swabs. Slowly but surely I wipe away all the dirt.
This particular receiver had some deposits on the chassis that Windex would not remove so I had to use something a little stronger - Goof Off did the trick. It will eat at the silk screen on the chassis if you rub it very hard so try to avoid the silkscreen. But I do still clean over the silkscreen, just don't rub it too hard and it is fine. After the Goof Off, I went over it with Windex and then rubbed it with a dry cloth to remove the last of any residues. Again, I use no polishes, it is just clean aluminum. All the original silkscreen is still in place. Goof Off is a pretty benign cleaner that removes most stains and residues.
The tube sockets that are secured with screws are all loosened off so that the area around the sockets can be cleaned thoroughly. When I'm done, I re-install the sockets with new stainless hardware.
I also use GoJo on the front panel. It works extremely well for removing Nicotine stains. I have never seen it affect the silkscreen in any way. I use an old toothbrush to work it into the wrinkle finish. This particular receiver had specks of black paint all over the front panel where someone had obviously splashed some paint on it. The only way I found to remove this was to painstakingly scrape it off! I used a stereo microscope and fine dental picks - this took me several hours to get it all off but the finished panel looks beautiful so it was worth it! I clean the knobs with plastic polish (available from Auto parts store) and I sometimes use black shoe polish as well. The white lines on the knobs are replaced using a paint stick available from Antique Electronics. Be sure to scrape out all the old paint first, let it dry a little before wiping away the excess. All the glass in the front panel is cleaned using Windex. The meter is dismantled and the glass in it also cleaned with Windex and then re-assembled. I usually polish the meter body with plastic polish.
The underside is cleaned with compressed air and brushes. The brushes free up the dirt, especially on the wiring harness and the air blows it out of there. Wear a mask and do this in the garage with the door open. I also use Windex, Q-tips and rags to clean any large bare metal surfaces underneath. At this point I usually clean up any wiring that was hacked on by a previous owner and I replace any bad components. I go to great lengths to find components that look similar and are of high quality. I check the value of every resistor. I systematically go through the schematic, highlighting every component as I check it. Anything that looks suspect is replaced. All of the wiring has to look neat and the way you would expect to see it in a Collins rig! Just about every piece that I have restored has worked first time even after a thorough refurb such as this. You have to be patient and diligent - check everything and if it does not look right or perfect, investigate and correct it. I usually check all the wiring per the schematic. Sometimes it is not easy to see where a previous owner has modified things! Generally speaking I like to leave things original but I do make modifications if I think they are worthwhile. This receiver has not been modified in any way. It works great stock!
If necessary, I will clean switch wafers. If very badly oxidized I will clean with Brasso (just the moving metal part). It is applied very sparingly using a very small short bristle brush and cleaned up with Q-tips and alcohol. When I'm done, I apply de-oxit but just to the metal parts and also sparingly. I do not douche the whole wafer. The wafers on this receiver were in good shape and needed only a light clean. The antenna input wafer is usually the worst due to the antenna being left on for long periods of time and the static discharge along with it!
I have never installed an overlay on a dial drum. I just wipe these down with Windex also. I do this many times and gradually the old oxidized surface comes off. You have to know when to stop! It will not look as nice as an overlay, but it is original! Obviously if you go too far, you will need to install an overlay!
Once all the parts have been cleaned and the wiring cleaned up and ready to accept the transformers again, the re-assembly begins. This usually goes very quickly. Its just like building a new radio! The transformers are wired in as original and the wiring is re-laced. After I'm done you can not tell it is not original but for the fact that the lacing cord is not quite the same and I don't put red dots on my solder joints!
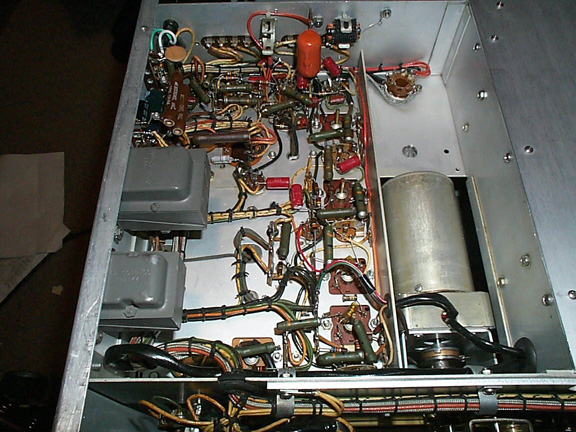
This is the underneath after the restoration. All the paper caps have been replaced. The wiring has been re-laced. I had to make a cover for the RF deck (underside) as this was missing and you can see this installed in the picture.

Once it is all back together it was carefully aligned. I have a good selection of HP test equipment and a network analyzer makes easy work of stagger tuning the IF. This receiver worked perfectly after re-assembly and is now one of my favorites.
I had the cabinet refinished in Black wrinkle powder coat. The panel on this particular rig is a darker shade of St James so the black finished cabinet is hardly noticeable. A light over spray with St James paint could be done to match up the colors but I'm not going to bother on this one.
I don't have any pictures of the outside posted here but it looks just as nice as the inside!