
1991 BMW 850i
page 8
Transmission Valve Body rebuild
Installing a DINAN transmission chip
Reverse Engineering the 4-speed EGS (transmission controller)
A lucky find on Cragslist!
Power steering pump rebuild
Upper oil pan gasket replace
Transmission Valve Body rebuild
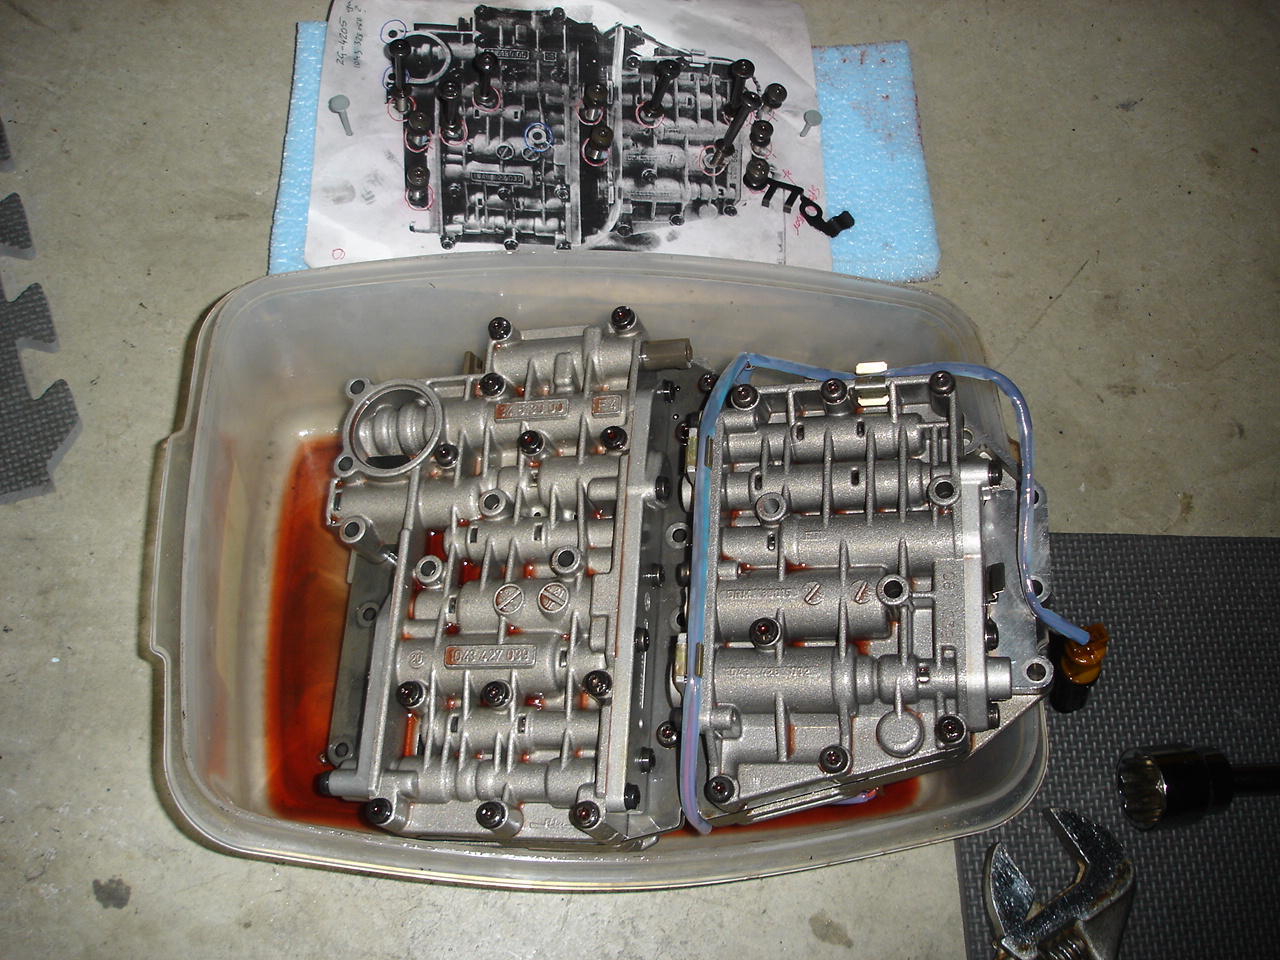
My transmission decided to stick in first gear (when in D) for some reason but I could still manually select all the gears without issue. It did this a few months ago but cleared up by itself. So I decided to drop the valve body to see what I can find.
This is the model number (4HP-24), part number (1043 030045) and s/n (0101152) of my transmission.
Here is an excellent DIY for removing and rebuilding the 4HP24 valve body http://twrite.org/shogunnew/files/jason/4HP22EH_ValveBody/4HP22EH-Valvebody.html
The valve body has screws of different lengths so i stored them in a piece of foam as you can see below.
There are 4 x solenoids on this model transmission (4HP-24 EH).
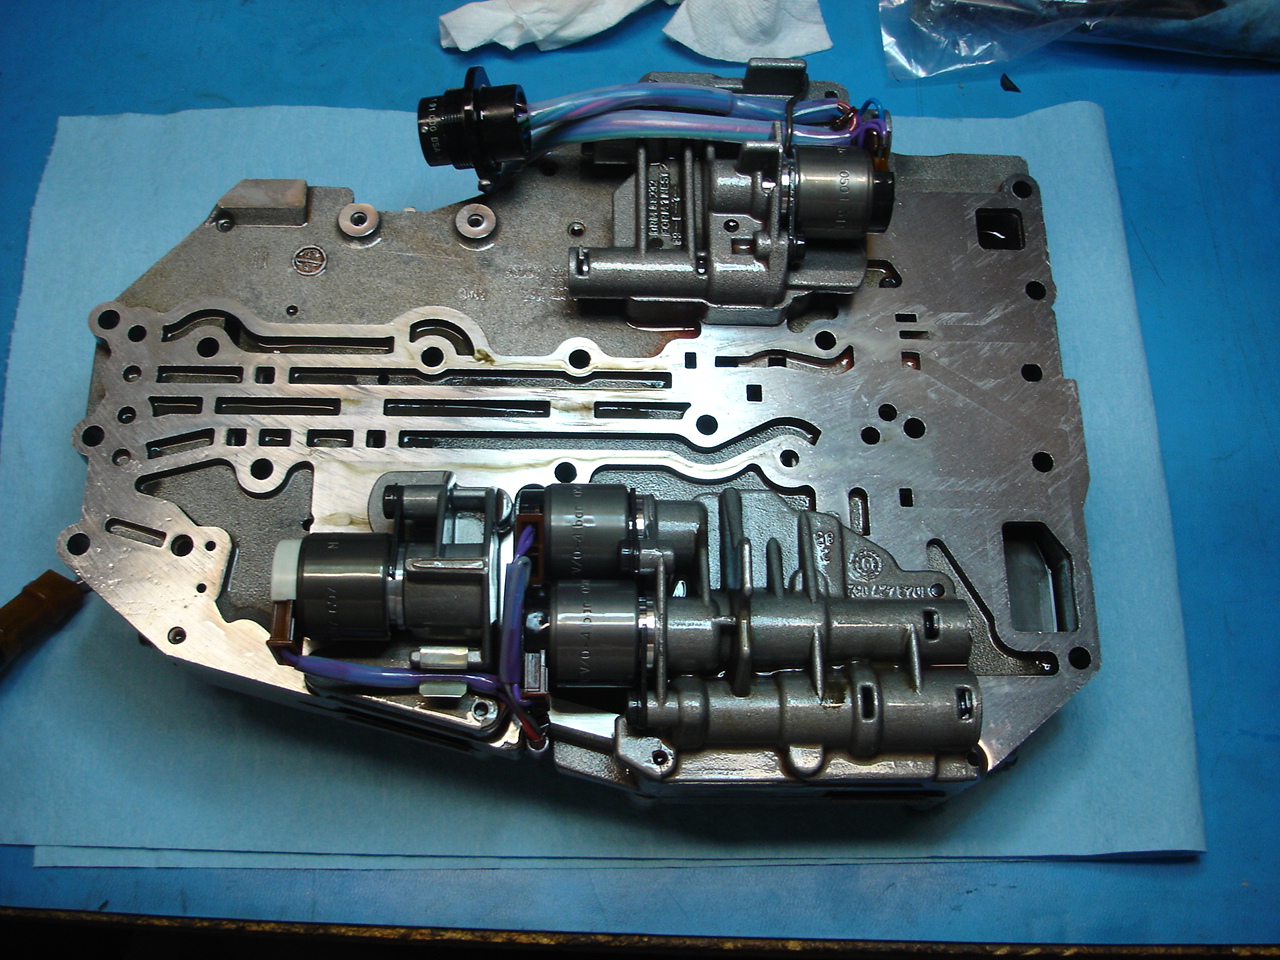

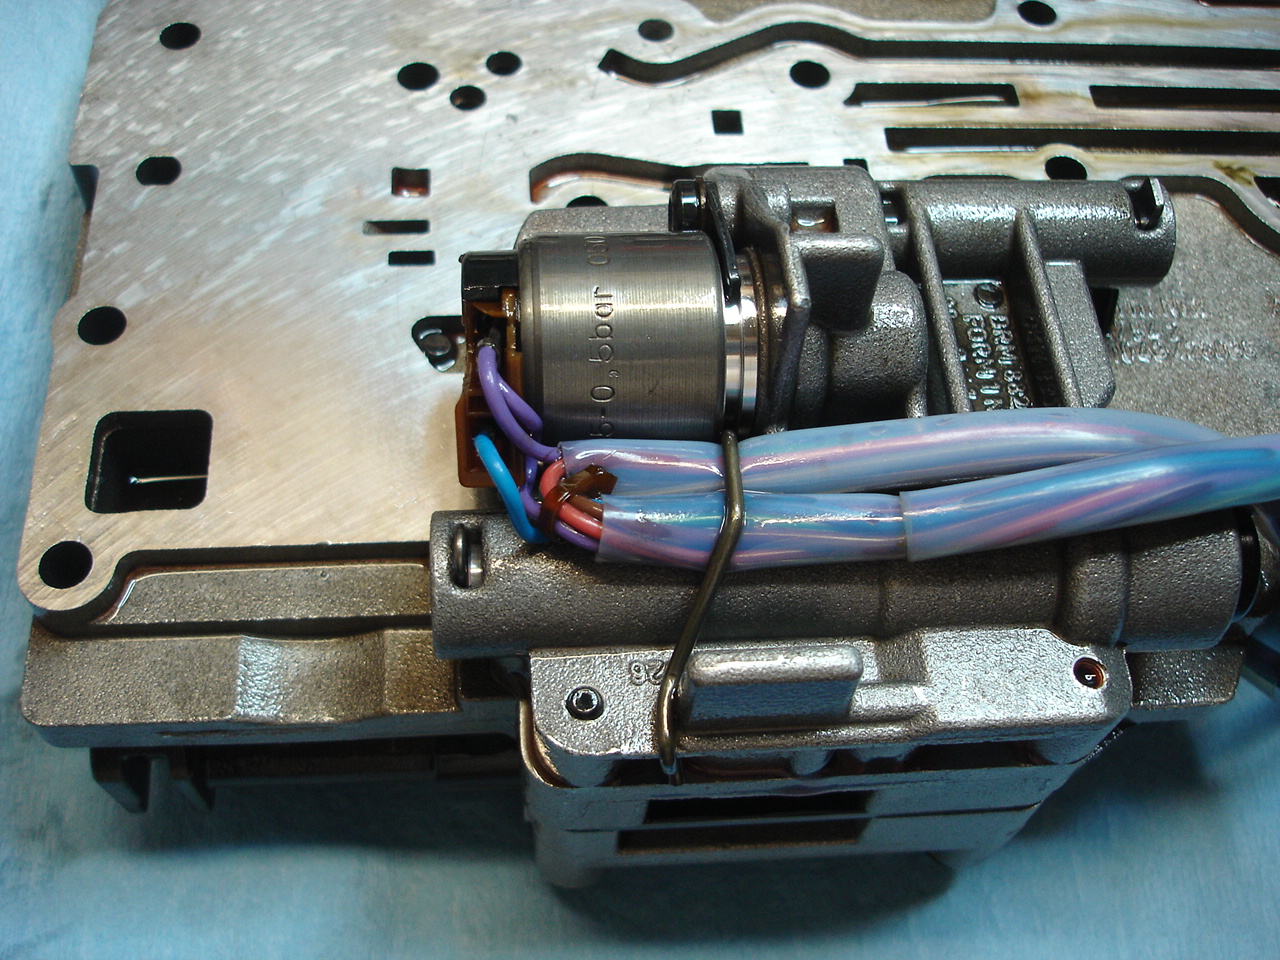
The connector shell on this solenoid (MV-5) has broken but the contact and wire look to be fine.
This is the output speed sensor.... which I believe to be the source of my transmission not shifting out of 1st. It looks ok but when checked with a DVM I found it to be open circuit (should measure about 265 ohms)! This makes perfect sense... the transmission does not sense the output shaft is moving so it assumes the car is not moving and does not need to change up to 2nd gear. I guess the transmission control unit (TCU) does not monitor the speed sensor in the rear differential.

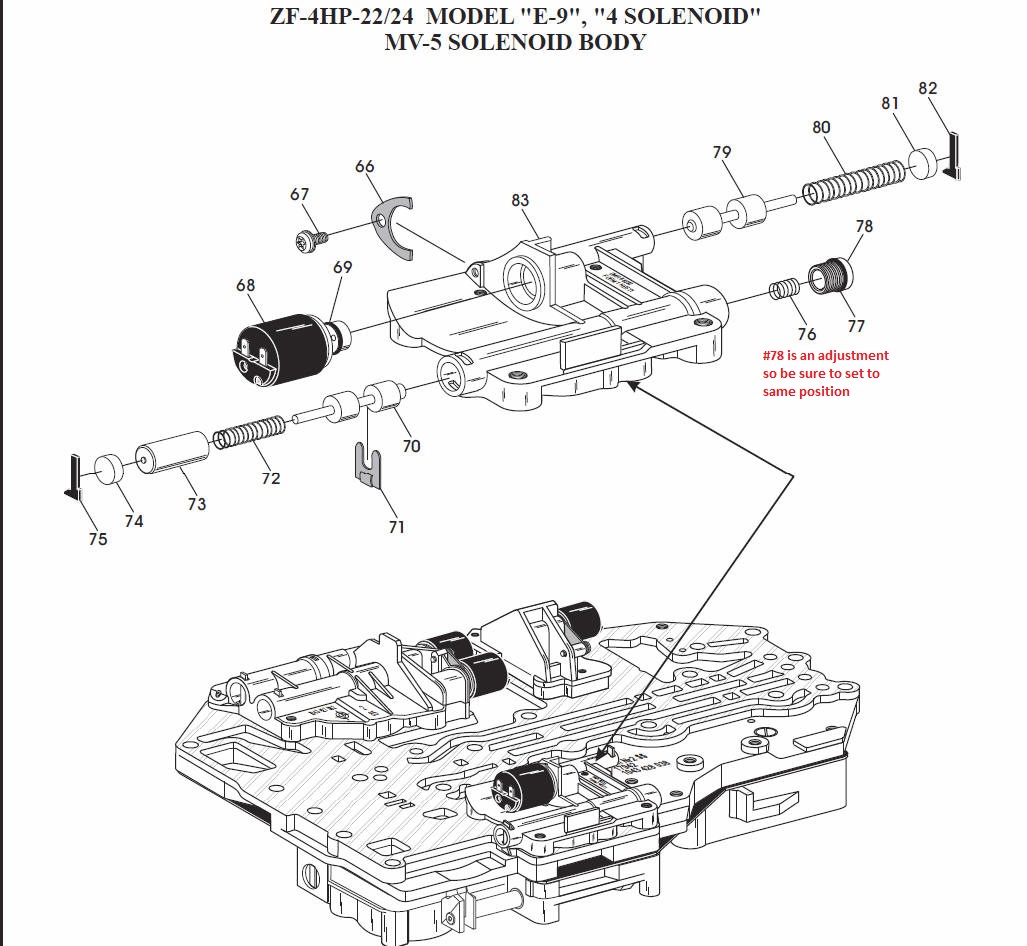
If you are dismantling everything as I am be sure to note that plastic screw #78 is an adjustment (transmission line pressure). Measure its protrusion before removing it so you can return to same setting. I only noticed this after dismantling but my pics were clear enough to set it back where it was.
I stored the checkballs and accumulators like this. The .218" ball in my transmission measures 0.175" and looks to be standard as it is not worn so I will keep it. Also note the gauze filter at lower right which is not shown in the ATSG documentation.

Here's everything apart. The main plate (front) has been cleaned but the 2 lower sections have not yet. There is only one gasket in this valve body which I ordered from Cobra Transmissions (part# 69320EA). So far everything looks to be in very good shape with very little wear. There is quite a lot of accumulated dirt in some of the passageways but mostly in unused passageways where I doubt it will affect perfromance.
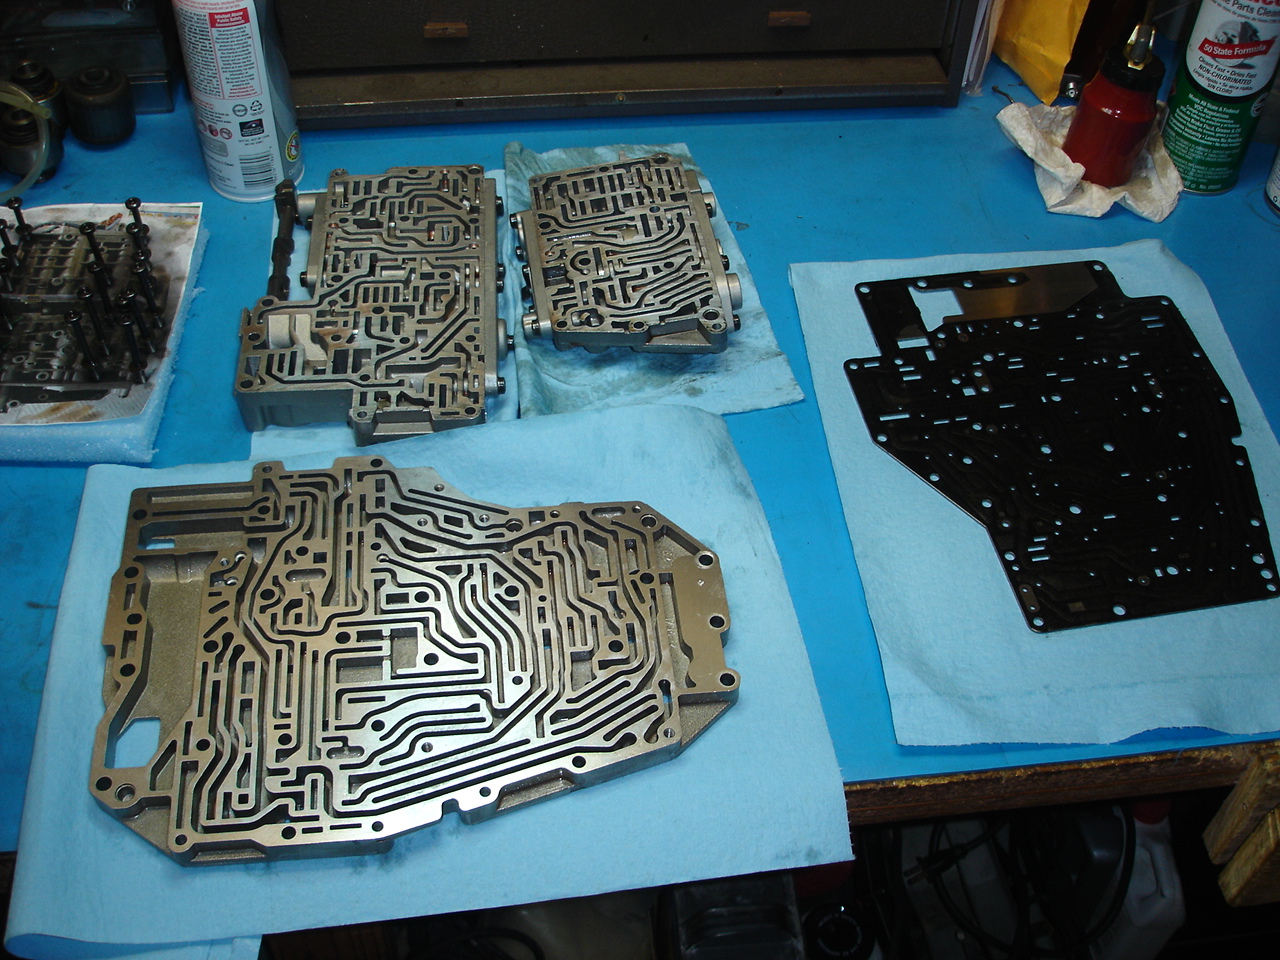
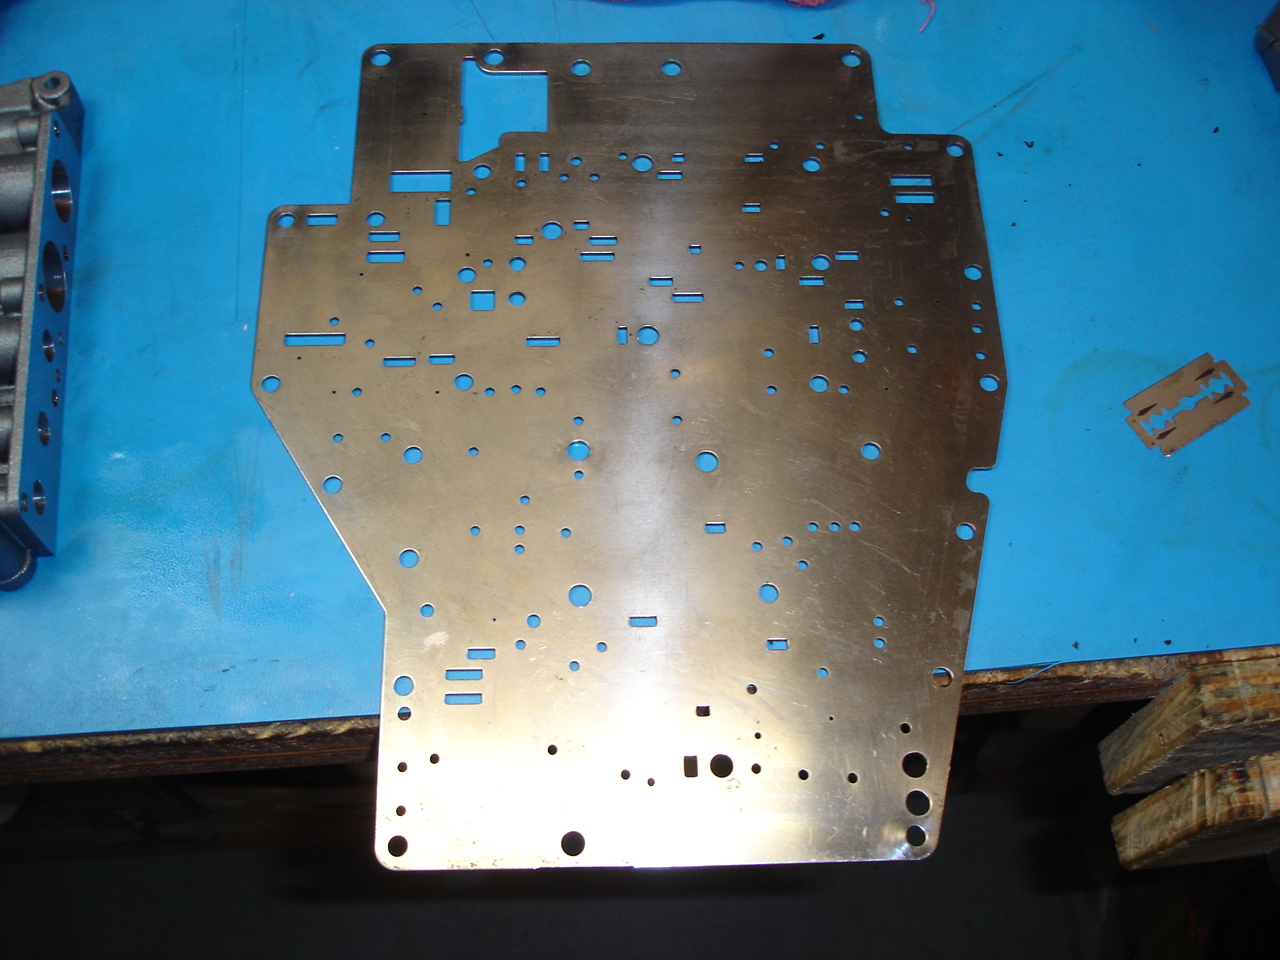
Removing the old gasket was a time consuming job. I ended up soaking the whole thing in Acetone (in a shallow container formed out of aluminum foil) for a few hours and then scraping away with a razor blade. After that I removed the residue and small spots of gasket with some wire wool. I purchased a replacement Gasket from Cobra Transmission (part # 69320EA).
At first I thought this was wear but now I believe it is probably a manufacturing defect. This hole houses the small plastic valve and spring that sits up out of the lower rear valve body. There is no wear on the plastic part. I'm not real happy about it but the transmission has 133K miles on it and the valve body at least looks to be in excellent shape so I guess it is OK to re-use this.

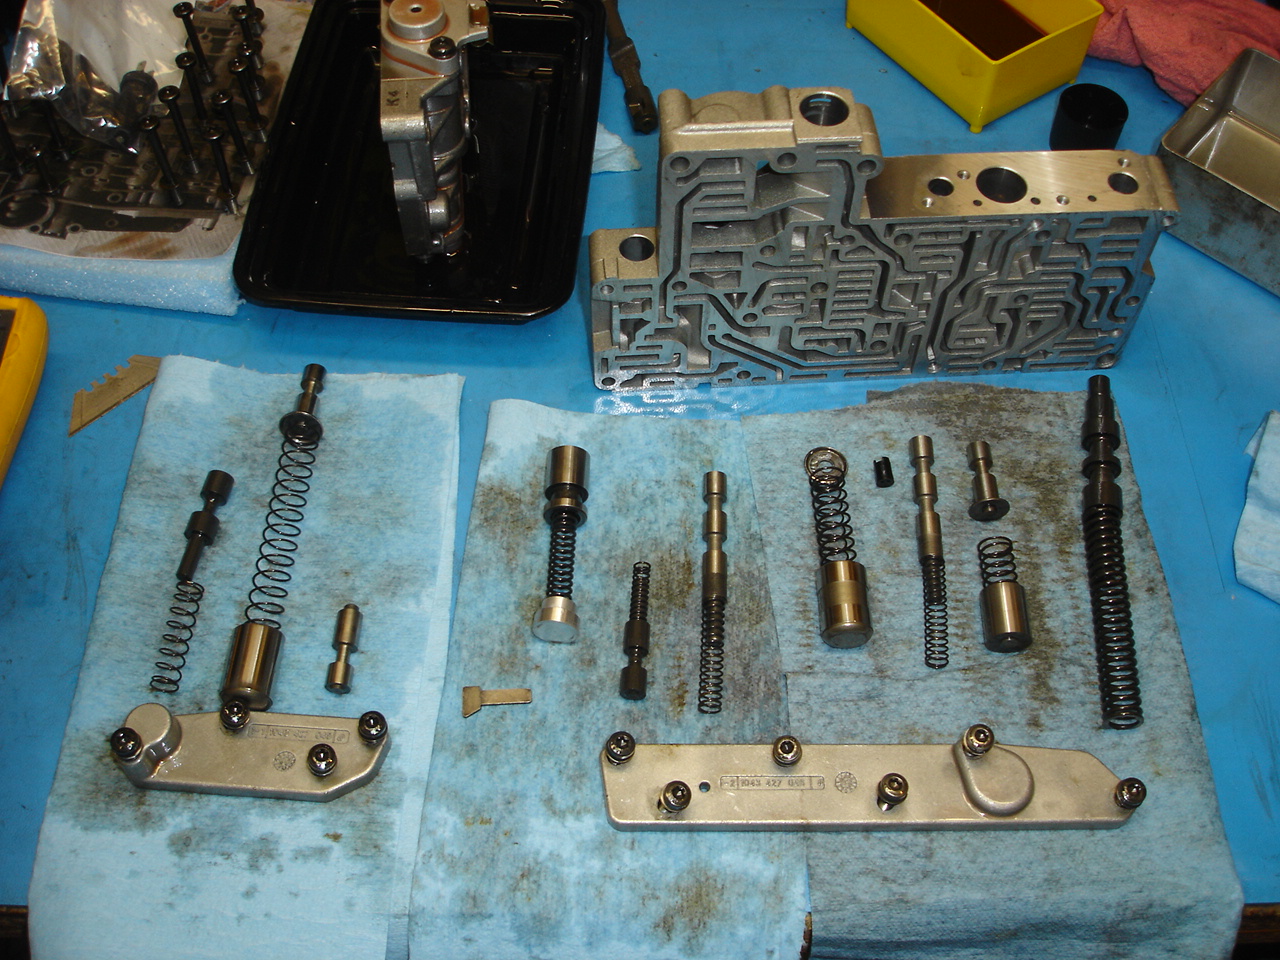
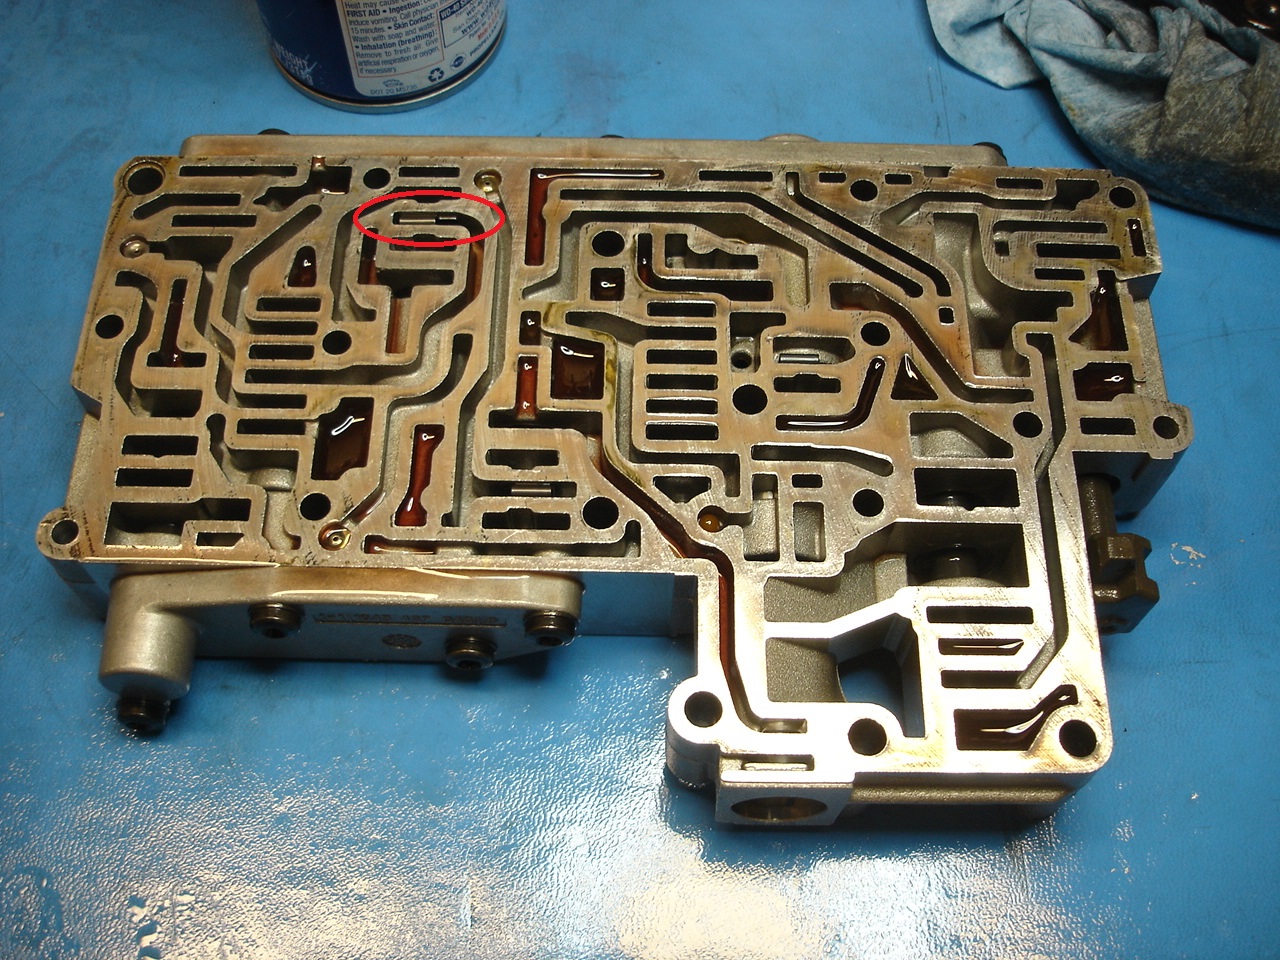
Here are the internals of the lower rear valve body. Everything was meticulously cleaned with mineral spirits and then blown off with a air hose. All of the spring lengths were checked and look fine. I don't see any obvious wear on anything!
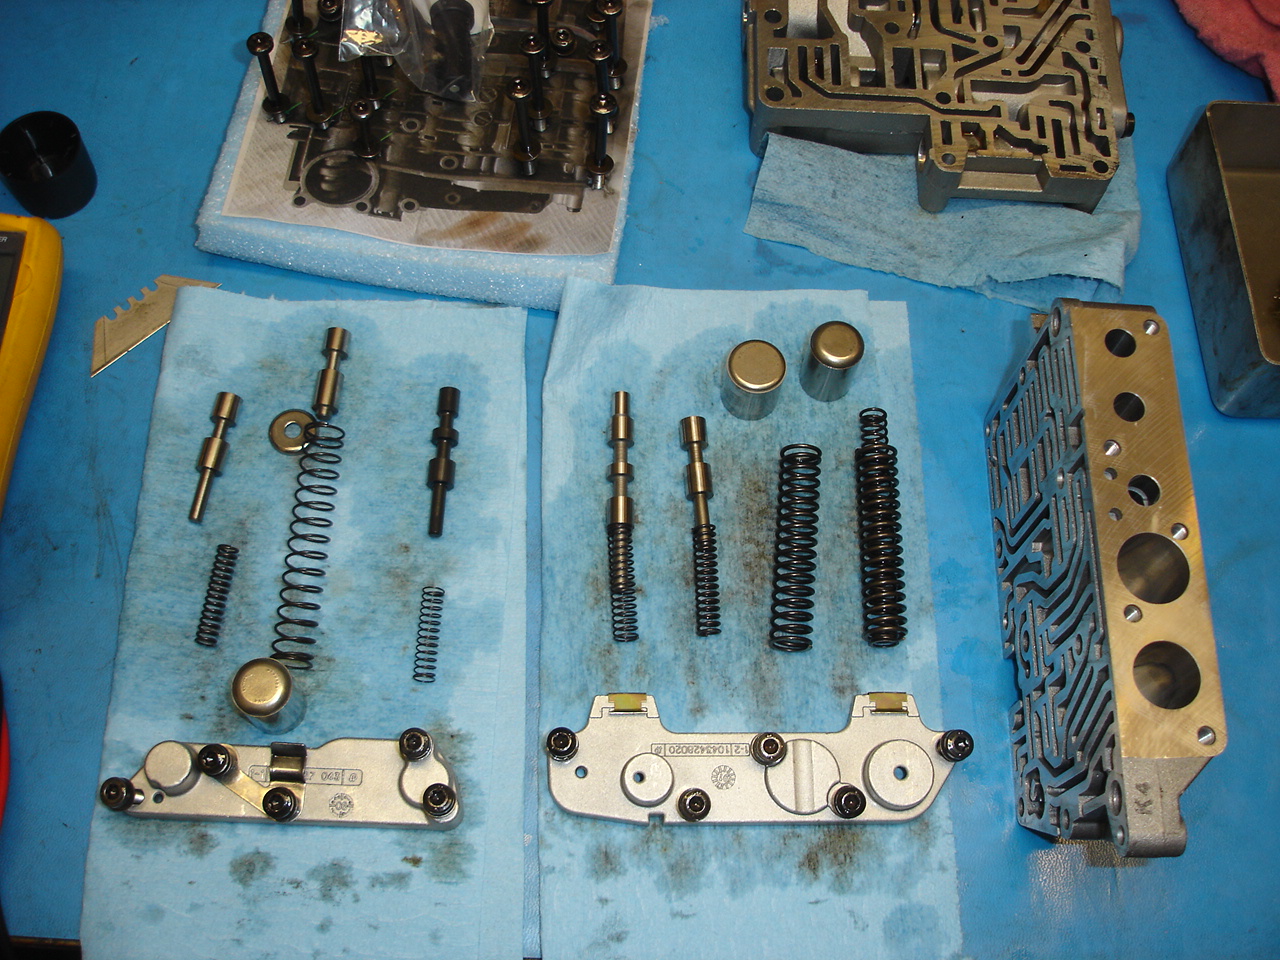
And here are the internals of the lower front valve body including a small black plastic plug that does not appear in the ATSG diagrams.
Note the position of the circled retainer. The documentation I downloaded on the web shows this 2 slots lower. Before I figured this out I could not figure out why it would not go in! Everything else agreed.
Valve body reinstallation was uneventful; I installed a new O-ring on the connector (1-1/16" x 1/16") and of course a new speed sensor. I also replaced the shifter shaft seal for the 2nd time as it had a slow leak. This time I used a dual lip seal. The seal I removed came out pretty easy and appeared to be nicked so maybe I damaged it when installing (hence the slow leak). The new seal is sealing perfectly - not a single drop in 1 week from the entire car... it's come a long a way since the day I brought it home.
At first the shifts were very rough but it turned out I was about 2 qts short on transmission fluid! I wasn't expecting it to take almost 2 gals of fluid to bring the level in dipstick range but it did. Once filled the shifts smoothed out. Now it no longer has harsh shifting when cold and overall feels a lot smoother!
Installing a DINAN transmission chip
I purchased a DINAN transmission chip on Ebay for about $50.
The transmission controller is located on the passenger side of the trunk and installation was very straightforward.
This is my spare transmission controller that came with the replacement transmission I purchased


Reverse Engineering the 4-speed EGS (transmission controller)
This project involved reading out the EPROM binary file and looking for patterns (map tables). I was able to glean some information from the web but most people that go down this path are unwilling to share what they learn. It is very time consuming... spent many hours on this. The goal is to modify the shift patterns, especially in Sport mode where I would like to use all 4 gears.
It's not easy to keep track of which gear the car is in and if the Torque converter is locked or not so I hacked into the EGS controller in the trunk. Basically I have added a small relay across each of the solenoid outputs to the transmission. Since I removed the CD changer from my car there is a multi-conductor cable available from the trunk to the cockpit! I tapped into it ...

And in the cockpit I added this simple display... I placed it here so I can see the speed at which each shift occurs.

As I drive around now I can quickly determine when the gear changes occur, into which gear and when the torque converter locks.
The EPROM file is mix of operating code and look-up tables. The tables are identified by looking for patterns and after a lot of work I identified a MAP vector table (at address 3500h) that tells the operating code where to find these tables. There's still a lot I don't fully understand but the shift tables I have successfully decoded...
Below are the shift (map) tables for the US version (which disables 4th gear in Sport mode). These tables show when the transmission up-shifts and down-shifts, also when the torque converter locks and releases.
Gear changes (and torque converter lock) is proportional to road speed and throttle position and load. In Sport mode the gears are held longer before upshifting.
Through this work I determined the changes in the Dinan transmission chip (D902-0125) I purchased above vs. the stock chip are so minor as to be worthless in my opinion!

For comparison, here is the EU version (which has 4 gears in sport mode but the car is wired differently that US so not an easy change to make)...

You will notice in the tables above that 4th gear in the US version has been disabled by simply moving the shift speed to ~ 110 MPH!
Sport mode in the US version is engaged by moving the selector to position '3' so it would be counterintuitive to allow it to shift into 4th gear but that is precisely what I have done! I enjoy the same brisk acceleration in Sport mode but once I've reached cruising speed the transmission shifts into 4th. At first I worried the transmission valve body might prevent 4th gear being engaged with the selector in the '3' position, but this transmission is electronically controlled and in forward drive modes is controlled by the EGS (the valve body does mechanically engage Reverse, Neutral and Park modes).
Here is my modified Sport shift table which I have implemented in EPROM. It's not quite as aggressive as the EU version but I'll continue to refine it to my liking.

Only half the EPROM space is used by the EGS... the most significant address pin is tied high in the controller. By modifying the EPROM to allow this bit to be pulled low, you can switch between 2 configuration files. In my case the switch allows choosing between the stock design or my modified version!
Below is the EPROM with attached switch selecting Stock or modified configuration.

If anyone would like to have 4 gears in sport mode and a little bit brisker gear changes, I now have EPROM's for the 91 and the 92/93. I'll offer a 93/94 if someone supplies a stock EPROM (they are all very similar). After 94 I believe they went to a 5 speed transmission.
I charge $125 if you'd like to give this a try... and a little more for the EPROM with 2 x maps.
A lucky find on Cragslist!
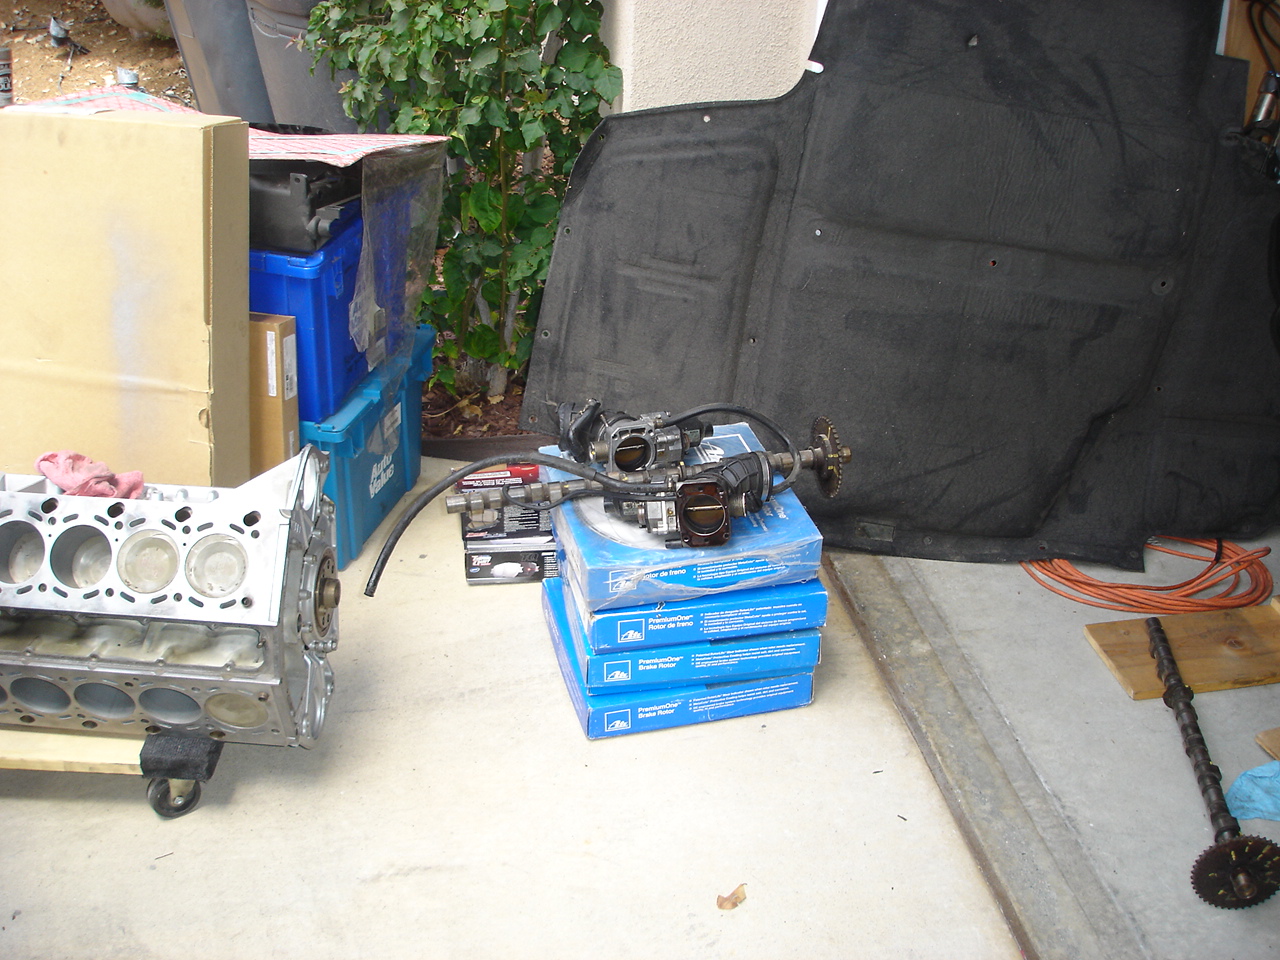
I often check Craigslist for BMW850's and came across someone selling off a bunch of new and used parts from a project that was never completed. It sounded like a great deal so I drove up to LA and purchased the lot.... thanks Charles!
I got a brand new set of ATE brake rotors (nice ones) and pads, a new hood liner, pair of used throttle bodies.
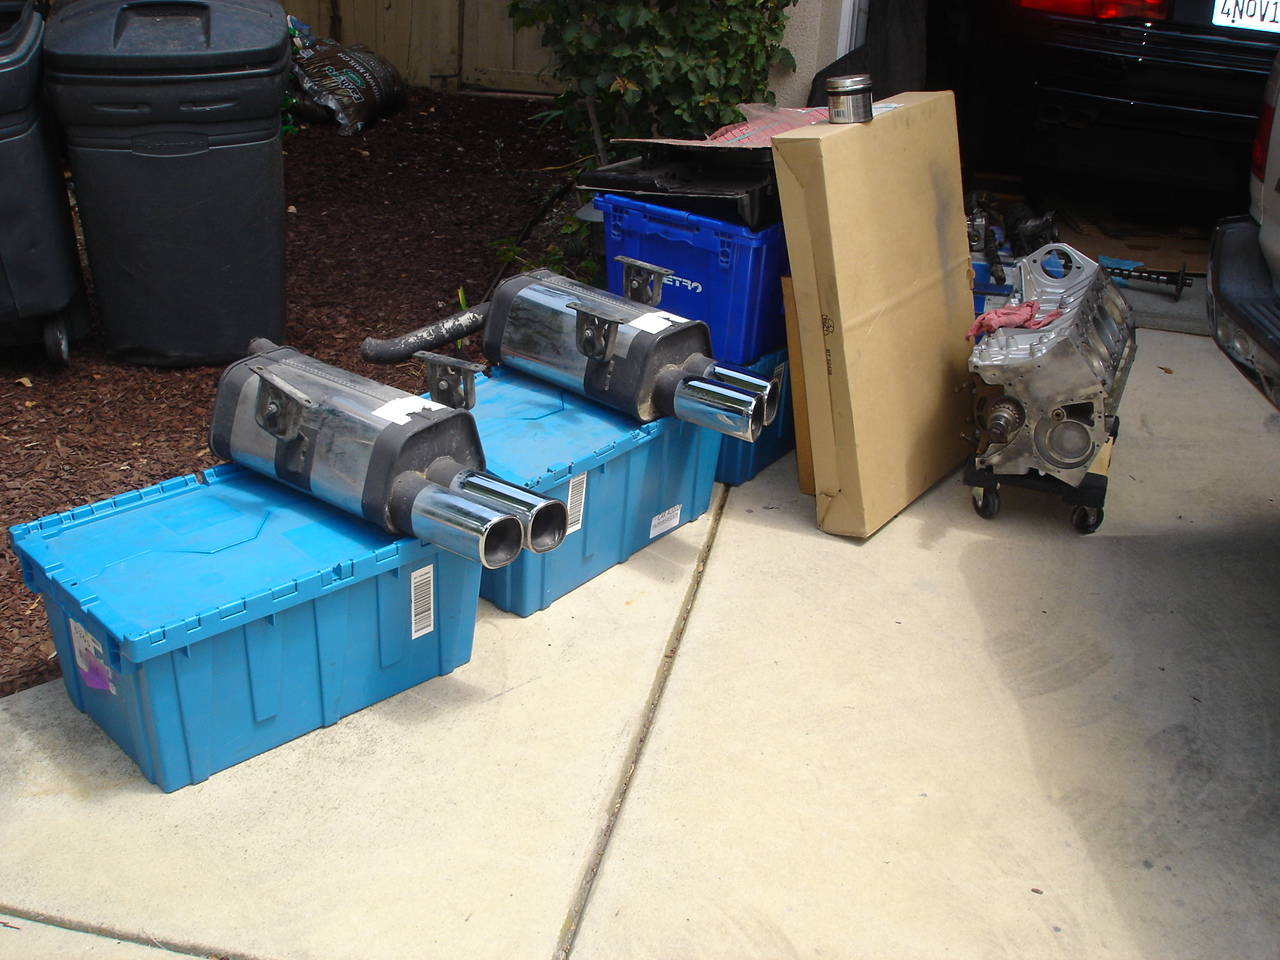
Some used Remus mufflers (now installed on my car). A brand new Behr radiator and fan. 4 boxes of misc new and used parts.


And a rebuilt short block! This has all new piston rings and lower bearings installed. Unfortunately, most of the other pieces are missing so not sure how to proceed with this yet. I have another complete motor from a wrecked car so if there is any damage to the block on it this will find a good home.

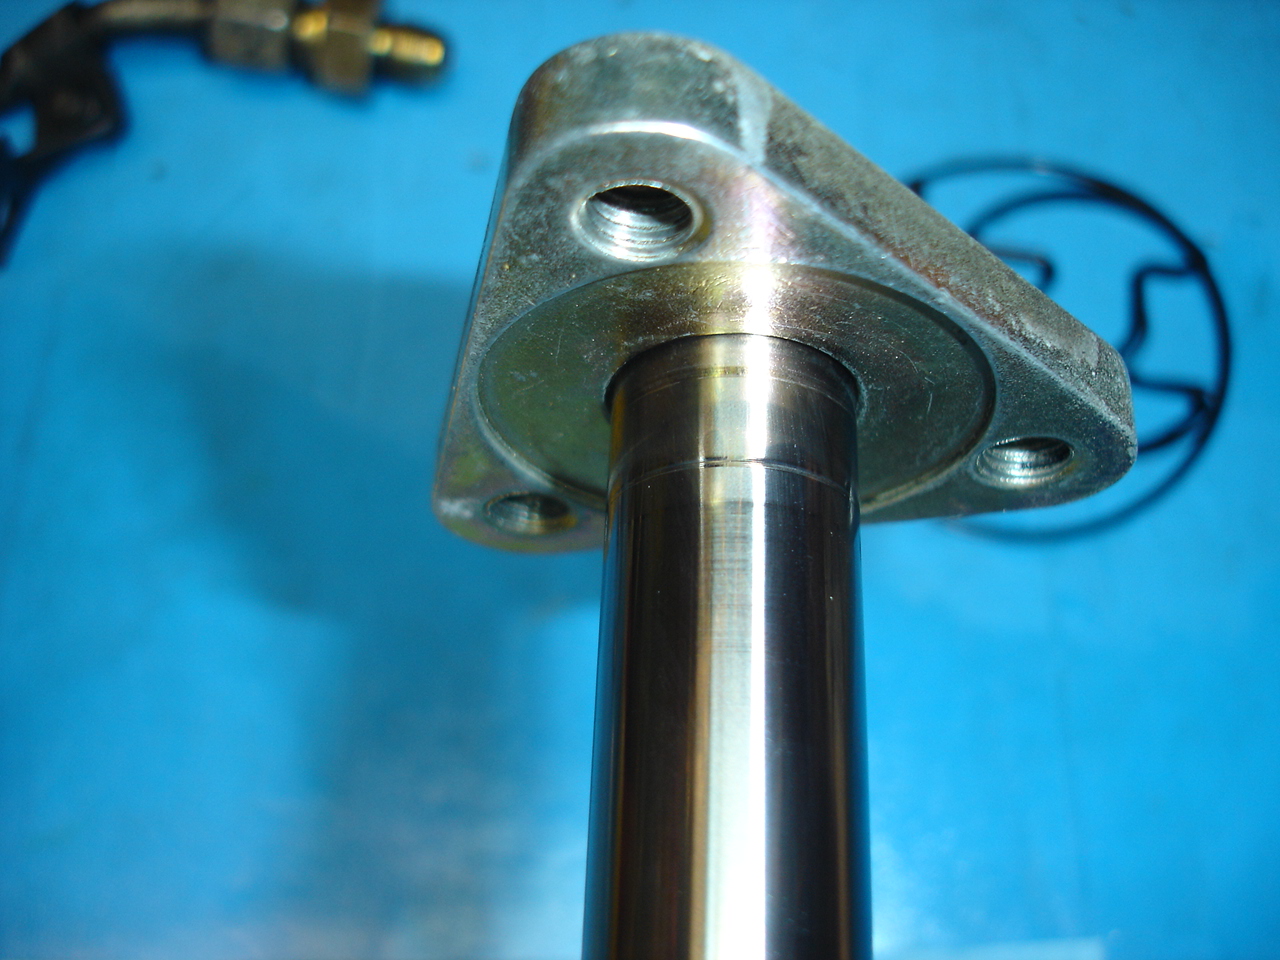
Power steering pump rebuild
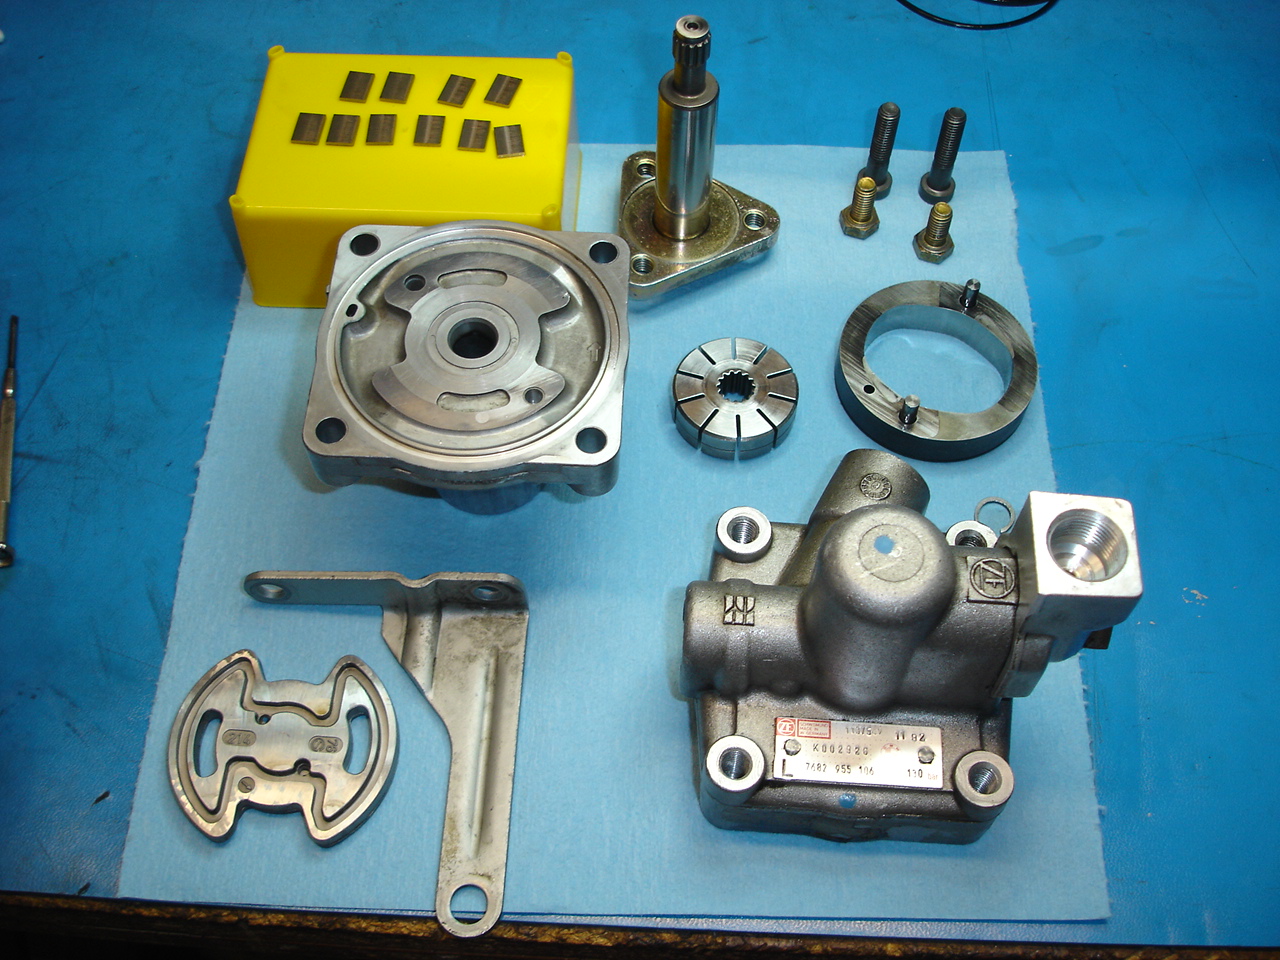
Amongst my haul of 850 parts was a used power steering pump and a couple of rebuild kits so I rebuilt this one...


Removing this retaining ring was the most difficult part of this job... eventually I was able to pry it off with a small flat screwdriver.

Here is everything after dismantling and cleaning.
Not unexpectedly, there is a small wear ring on the shaft where it contacted the seal. It's not that bad and would probably be fine as is but by not pressing the new seal in quite as far I can move where the new seal contacts away from these wear rings. There is no measurable slop (wear) on the shaft in the bore - it is very well lubricated with a continuous stream of hydraulic oil!
Here it is all back together and ready for installation. The case O-ring, main shaft seal and internal (dumbbell shaped) seal with similarly shaped rib and a new circlip are included in the kit along with a few other seals that were not required for this particular pump. Turning by hand it feels like a brand new part!

Upper oil pan gasket replace
This was a pretty big job, but not particularly difficult.
There are 4 x 10mm bolts in the bell housing. You can see then all through the large hole in the middle and you can remove 2 of them there but to get tot he the other 2 you have to drill some access holes (or remove the transmission)! I drilled 2 x 5/8" holes as you can see below. Before doing this I removed the sway bar and the rearward reinforcing tube.

Next I drained the engine oil and PS fluid, disconnected the 2 x hoses from the steering box, disconnected the steering coupler from the steering box, removed the dip-stick extension tube and loosened the bolts at the rear of the PS steering pump then emoved 1 x 13mm bolt on the PS pump bracket that secures it to the upper oil pan. Also must remove the front wheels, lower belt tensioner that is secured to front of the upper oil pan... and disconnect the front control arms and steering tie rods (I used some scrap pieces of wood to hold the wheel hubs in place and out of the way.
Then it is time to support the engine from above... and I discovered my engine support beam is a bit too short for the 850i !


As hokey as it looks it is is still very secure but for extra measure I also added support under the bell housing...

I lifted the front of the engine about 1/2"... just enough to where both engine mounts could be moved up and down a little (previously removed mounting nuts on these)
Then it was time to lower and remove the front sub-frame with steering box.

Now you have unobstructed access to the upper and lower oil pans. My upper pan was filthy and I spent more than a few hours cleaning it...

Now is the perfect time to swap out the engine mounts as well. I replaced mine a few years ago and one is already shorter than the other so i'll replace them (they also look different although they were both ordered together... Corteco brand). The one that says Corteco on the side is already cracking! These are 10yrs old and only 5K mi!


I checked the oil pump bolts (all were tight) and the pump chain slackness... it was a little loose so adjusted to 8mm total play.
Looking up into the time chain cavity I also noticed the pivot bolt for the time chain tensioner was starting to back out! I tightened it up as well!
The gasket surfaces were cleaned ready for reassembly. I drained the oil a day before I dropped the pan and although I did get several drops of oil on my shirt/in my hair... it wasn't too bad. But you definitely whant to let it drain into the pan for a day or so before removing the upper oil pan.
I ordered an elring gasket and was expecting one like below...

But is seems Elring have changed the material and now supply this (below). Its the same thickness but not as rigid... more like thick paper. I asked the retailer to send me a green one and he sent me a 2nd gray one! So i installed it (I was told the green ones are much better quality).
