1991 BMW 850i
page 12
Ignition waveform analysis
So I'm still not convinced that my car is running as well as it should. Replacing the spark plugs and cleaning the distributor contacts (they were covered with varnish since new) made a very noticeable improvement and MPG jumped by 2 but it still lacks grunt and the idle seems a little bumpy.
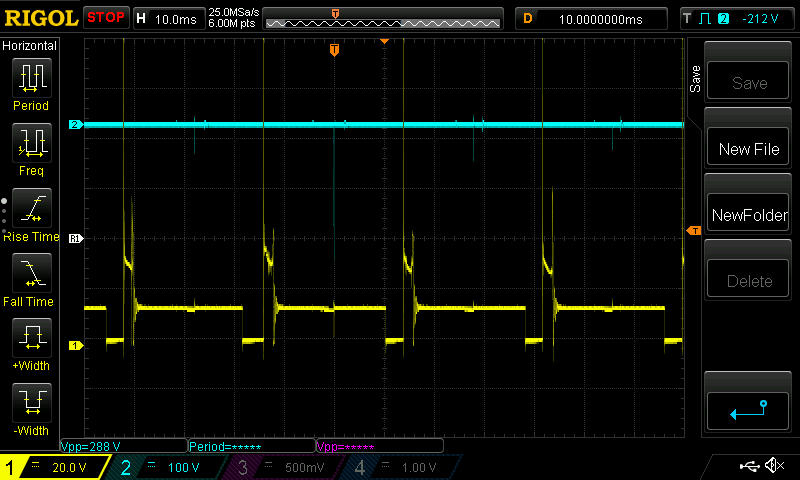
There is a lot that can be gleaned by analyzing the ignition signature... The waveform below was simply captured with a digital scope attached to the primary of one ignition coil. The sync signal was from a piece of foil wrapped around one of the spark plug cables but I have a better solution for it in the mail. There is a lot of info on the web about how to interpret what is shown below (here's a good example https://www.motor.com/magazinepdfs/052001_04.pdf ) i'm still learning and will post more results of my findings as well as some fuel injector tests I plan to perform.
The only possible issue I see so far is that the spark line goes much higher than expected (actually clipped in the image below but they are all of similar height). Since I have already tested the cables and both sides of the engine behave exactly the same, I'm not sure if this is because I'm monitoring the ignition coil primary or a real issue. I have a capacitive pickup cable (to monitor ignition secondary) in the mail and should know more soon.

Quickjack 5000SLX
I was wanting a QuickJack for a while but thought they were a bit overpriced at ~ $1450 and sales tax here in California. I kept looking on craigslist for a used one and eventually one came up, brand new! The seller had purchased it for track use but his plans changed and he never even unpacked it. I got it for $950. It's the BL-5000SLX model which is only just long enough for the 850i. If buying a new one I would recommend getting the BL-5000EXT which is a few inches longer and will make placement under the car a bit easier. On the 850i the lifting blocks on my quickjack just barely pickup the jack points with not much to spare so they must be carefully positioned under the car before lifting.
This is the 12V version... hydraulic pump shown below. It does not take a lot of juice and can be powered by a small lithium ion battery which I have ordered on Ebay. Until it arrives I'm using jumper cables to a spare car battery.
It's a bit disappointing that the manufacturer doesn't package the pump and motor a bit better (enclose it). I'll need to come up with something to keep the dust and dirt off it.
I'll store the quickjacks under the car and leave everything plumbed up all the time. Blocks of wood under the hydraulic connections in pic below are to minimize the risk of accidentally kicking or stepping on these and damaging them as they are a bit exposed.
Engine hoist
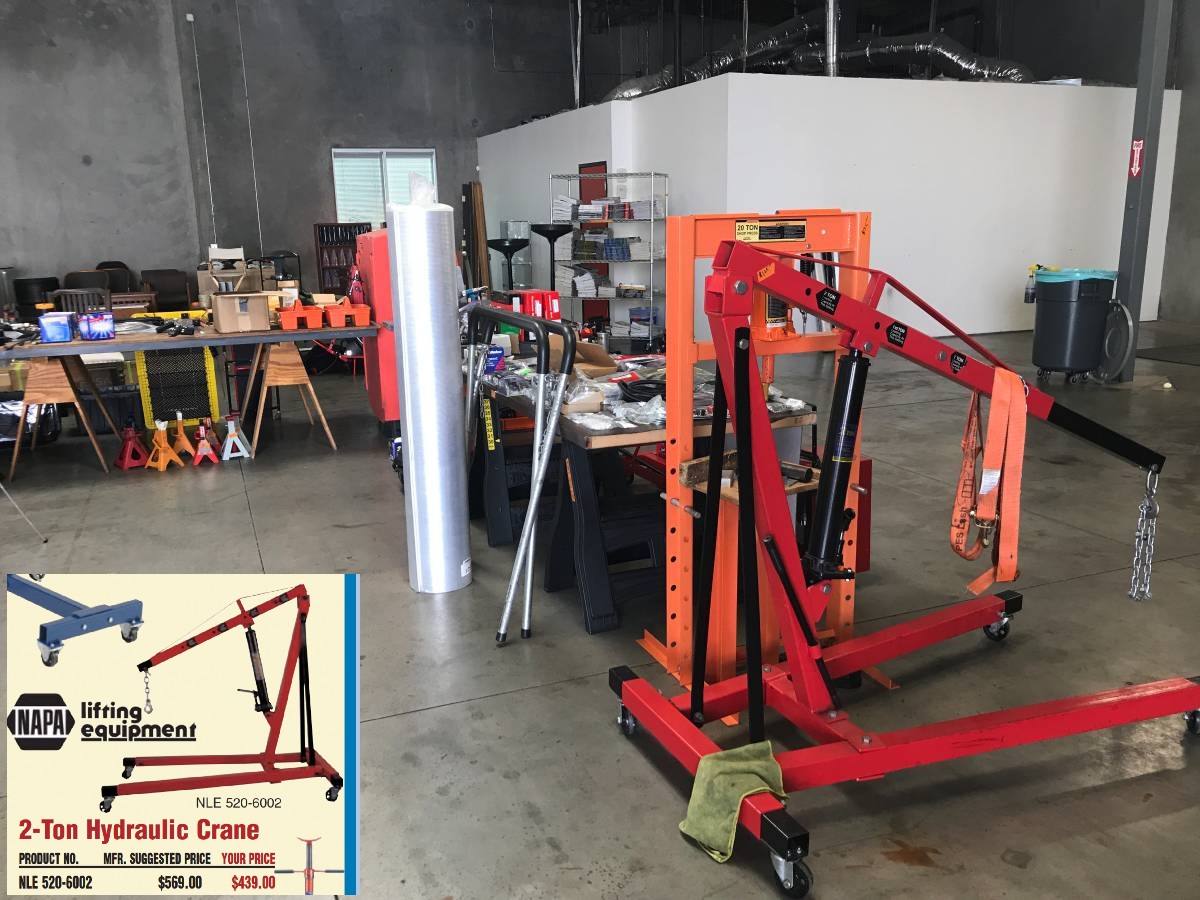
A local classic car shop was having a garage sale today so I picked up this Napa 2-ton engine hoist for $100. It's not a folding model but is quick and easy to tear down and takes up little space after doing so. It is equipped with extendable legs and has a longer reach than most. I was able to grab a few other odds and ends at a good price too. I always keep an eye out on Craigslist !

12 speaker HiFi System
The HiFi system in the 850 is a bit of a disappointment and not what you'd expect for a top of the line car.
My rear speakers were not sounding too good so I removed them for a closer look...
First you have to pop the speaker grills then remove a single retaining screw.
To drop the speak enclosures out you have to remove almost all the trim in the trunk.
To get to the drivers side speaker you'll have to disengage the hinge on the drop down tray that holds the HiFi amplifier and telephone system. There are 2 small levels (one on each end) that you push towards the center to release and then the whole tray can be pulled free and moved to the side.
With trunk trim removed and the single screw removed from the top, the speaker box's (one each side) can be dropped out.
Here's one of the rear speaker assemblies which includes a 4-1/2" base, a 3" mid (both wired in parallel) and a small tweeter. As is very common in these cars, the foam surround on the 3" mid is disintegrating. I will replace these with Faital PRO 3FE22's which are drop-in replacements. The tweeter and 4-1/2" base appear to be in good shape so I'll leave those alone for now.
The 3FE22 is a drop in replacement... even the connection terminals are the same size!
I changed the door speakers as well. These are exactly the same speaker as in the rear with the same degraded foam surround... 3FE22 is a direct swap!
The 3FE22's made a huge improvement to the sound quality in the car. They also made it pretty obvious that I should add a subwoofer to get some decent base but that will have to wait for now.
While I was at it I checked the window regulators and found a couple of loose bolts on the driver side. After tightening these no more clunking sound when actuating the window!
The door cards are held on with 3 screws and a bunch of these retainers. It is a good idea to buy a bunch of these as they often break when removing the door cards.
When one of my front foot well speakers died (open circuit) and based on recommendations on the E31 forum, I installed Dayton CF120-4 from Parts Express (~ $70 shipped for 2pcs).
These are a little smaller than the original speakers (4.5" vs. 5" original speakers) so it is necessary to drill 4 x new holes to mount them. The wire spade terminals mate right up.
This is the original cell phone hardware that was mounted above the HiFi amplifier. I have no use for this anymore so I removed it but I'll hang on to the bracket which could be useful to mount a sub woofer amplifier (future project).
Here's a look inside the 12 speaker HiFi amplifier; it uses 4 x TDA2005 dual amplifiers delivering about 5 watts/channel into 4 ohms!
As of 12/28/20 I am no longer using this amplifier... after fighting alternator whine issues with it I replaced it with some TPA3116 based amplifier modules.
The frequency response of each amplifier is tailored to the speaker being driven (active filters on the left).
The base and mid in the rear speaker pods are wired in parallel and driven by one channel. The tweeter is driven by a separate channel and I believe the same arrangement applies to the front speakers (base in the foot well, mid and tweeter in the door).
I checked the ESR of most electrolytic capacitors in the amplifier and all were OK. The front and rear board assemblies are detachable. By modern standards this is a very basic and inexpensive amplifier and explains why the sound system in this car is so underwhelming.
Exhaust back pressure
My car is a bit reluctant to rev and I suspected this might be due to partially blocked catalytic converters. So I purchased this exhaust back pressure kit on Ebay which screws in place of each oxygen sensor to measure the pressure in the exhaust manifold ahead of each catalytic converter. Unfortunately it was received with a faulty pressure gauge... the indicator needle is shifted from the zero mark with no pressure applied but otherwise seems to work ok. I asked for a replacement and was given a full refund! It seems to work ok just need to re-position the scale (black marks on the window).
This is the tool you'll need to remove the oxygen sensors (22mm oxygen sensor wrench). As you can see, the sensors in my car look relatively new. It is a little bit fiddly getting these out as there is very little room in which to allow the wire to turn as the sensor screws in or out of the exhaust system. I loosened some of the exhaust system hangers to give me just a little bit more room to work.
Here you can see the adapter screwed into the driver side oxygen sensor hole and the pressure hose attached.
The pressure hose is long enough to reach below the drivers door so it can be viewed while running the car.
Results of the exhaust back pressure test were normal... the needle barely moved and in fact there was little a bit of vacuum at idle which I'm told is OK. Both banks were the same so I guess the cats are still in good shape. My last smog check results were excellent.
Working under the quick Jack is nice but I wish it was just a few inches higher then I'd be able to easily crawl on all 4's while underneath.
Headlight removal
Headlights were removed to replace the rotted couplings on the air inlets to each air filter box.
Headlights are held in place with 4 x 17mm nuts and one 10mm bolt (circled below)
I remove one nut at a time, added masking tape, re-installed nut and used a pen to draw around the nut. This allows you to re-install the headlight in exactly the same position (very important). I did this to 2 diagonally opposite corners. You are supposed to lock the threaded stud in place when removing these nuts but in my case they didn't budge when removing the nuts making this easy.
New intake boot installed on passenger side. These are a tight fit and took quite a bit of fiddling to get into position.
Here's underneath the driver side headlight. The yellow connector is the outside temperature sensor which simply plugs into the side of the front brake cooling duct. On my car it was dangling free.
Thankfully no surprises, everything looks to be in great shape under each of the headlights.
This connector was just hanging loose on the driver side. It doesn't seem to go anywhere so I taped it up and tie wrapped it in place.
Here's a picture of the underside of one of the headlight assemblies. They are in pretty good condition. The headlight wiring harness often deteriorates but these are excellent so were most likely replaced already.