
1991 BMW 850i
page 1
This is my 12 cylinder (V12) 1991 BMW 850i acquired Nov 2013 with 133K mi. This rust free car has always lived in San Diego and I am it's 3rd owner.
At the time I acquired this car they could be picked up quite inexpensively... about $5K and up (more for one that is well sorted). Over the year or so that I spent looking for one, this was one of the nicer looking cars I came across in my price range. Mechanically I'd say this car was average; it was quite well maintained when in service but had been sitting idle for 6 yrs prior to me buying it. Not being driven takes its toll on a car like this... It had a huge oil slick underneath when I went to see it. Power Steering leaks are a BMW trade mark so I was not put off by this, it also leaked engine oil and transmission fluid! With only a very short test drive I took a bit of a gamble on it, figuring I could fix the mechanical issues. Cosmetics are harder for a home mechanic to deal with and in this regard this car was pretty good (no paint work required).
These are hobby cars nowadays, not really suitable for a daily driver unless thoroughly overhauled which can be an very expensive proposition if you don't do the work yourself. Many plastic and rubber parts (especially under the hood) become fragile and brittle with age. BMW likes to use recycled plastic which is good for the environment but not good for longevity. Oil seals don't seal anymore, hoses turn hard and brittle, gaskets old and leak.... at some point I expect to remove the engine and transmission from this car (for gasket repairs) but I'd like to log some miles on it first. The engine is a huge V12, a little intimidating at first but is actually a very simple design, not overly complex and quite easy to work on.
I paid $5,000 for this car. Had I not been so eager I might have picked it up for less but I wanted one and this was the best one I could find in this price range. One of the things I liked about this car is it came with lots of service records since the car was new (over $40K worth!) which I catalogued here images\850i.xls . As I work on the car I am finding a few things that were replaced but not listed in the records (a nice bonus) and lots of things that should have been replaced long ago but were not (valve cover gaskets for one). If you want to buy one of these cars I think the best car to look for is one where the owner has already put a bunch of money into it and has run out of patience and/or funds. You can put $5,000 into one of these cars very easily and the car won't be worth much more than it was when you started! I spent over $2,500 just in parts to overhaul the engine compartment... it is surprising how quickly it adds up!
The 4 pics below were taken a week or so after I purchased the car; I clay bar'd and polished the exterior paint but not much else at this time. I cleaned up the battery compartments due to signs of a battery acid leak in the past. The MID was minus some pixels (very common) so I removed it in order to replace the LCD and cable.
The interior leather is in nice condition, shown here before any cleaning. There is some slight wear on the drivers seat bolster that I plan to touch up with a repair kit.
I have the Radio and MID (trip computer/warning message display) out in the pic below. The MID had the classic missing pixels issue and has since been repaired with a new LCD and cable.

The wheels are MPAR replicas but good ones. 3 of them have no marks what so ever but the fourth has some very minor curb scuffing. They are not staggered; 245/40/18's all around. The tires are in near new condition but have bulges from sitting so long.

This is the original spare wheel which looks to have seen little or no use! I believe the car had these style wheels on it when new.

I bought this car 'as is', a project car with no smog and registered non-operational. The exterior was in reasonably nice condition but the mechanicals needed some work...
The majority of the issues I identified with this car are simply due to age and BMW's use of low grade plastics and gaskets.
1. Very bad PS fluid leak (there was huge oil slick underneath the car when I bought it). This turned out to be a combination of hoses, steering box and brake booster. All replaced or rebuilt.
2. MID display bad - a very common problem with BMW's. I disassembled and repaired this twice. First attempt broke the LCD. 2nd attempt with a brand new LCD worked perfectly.
3. Battery compartment showed signs of an acid leak long ago (one of the old receipts mentions it). Damage was minor and required only cleaning and paint touch up. This car has 2 batteries, one on each side of the trunk. They are wired in parallel and so must be maintained together - if one goes bad you really need to replace them both. I got this car with 2 brand new OEM BMW batteries!
4. Both front seats need to come out to fix for/aft adjustment. Passenger seat height also has twist. Not looked at yet. Ended up buying a replacement set of front seats.
5. Engine bay is very dirty and oily. Major cleanup and top end overhaul performed.
6. Possible bad lifter in one bank (tapping noise in passenger side valve cover). A loose banjo bolt was found. All of the lifters checked out ok.
7. Many hoses (fuel, power steering and vacuum lines) are brittle/damaged. There was no fuel smell as the 2 most problematic fuel hoses under the hood had already been replaced. I replaced just about every hose under the hood; every coolant hose, fuel hose, vacuum line, EGR (PCV) hose and low pressure Power steering hoses. I also rebuilt the charcoal canister.
8. Much of the Engine wiring harness had become hard, brittle and cracked. I stripped this back and re-wrapped much of it with high temp silicone (vulcanizing) tape. Also installed new crank position sensors.
9. Gas pedal must be pressed a long ways before anything happens... a common problem with this car caused by plastic bushings on the gas pedal that disintegrate. Confirmed and replaced.
10. Coolant was low when I got the car. There is no obvious leak anywhere but a few were found (valley pan, radiator hose and heater core). Valley pan gasket replaced, all new cooling hoses (front and back of engine), new water pump and a new heater core (big job).
11. Although the tires have lots of tread left on them, they all have bulges in them from sitting a long time, perhaps with low air. All the tires have been replaced.
12. Both fuel pressure regulators leaking fuel into the vacuum line. Both replaced. Fuel injectors also cleaned and rebuilt.
13. Auxiliary water pump had a broken hose flange - Replaced with a brand new one. I also replaced the heater valve with a new part as a precautionary measure.
14. Engine mounts appeared original and deformed, hardened and cracked. Both were replaced with new ones. The old ones were intact but compressed and hard as rock. The transmission mounts look to have been recently replaced so were left alone.
15. Transmission is leaking fluid. Looks to be from the pan gasket (easy fix) and possibly the seal on the shifter shaft (not so easy to fix). Replaced pan gasket, filter and shifter shaft seal.
16. Valve cover gaskets leaking - they looked to be original and leaking for a long time! Replaced along with valley pan gasket, new water pump and all o-rings. Many hours spent cleaning up the engine... cosmolene removed from engine cover and intake manifolds.
17. Intake gaskets leaking. This is a very common problem with this car. Most people seal them with gasket goop. I installed silicon gaskets from max Lumens (a great idea).
18. Valve seals. Although the seals appeared to be ok (no smoking exhaust), they are old and due for replacement. It is a big job but the parts themselves are very inexpensive and since the top end will be apart, I decided to replace them. A big job - took me a few weekends just to complete this.
Pictures below were captured as the work progressed. 2 years later it was running again but not finished. Restoring this car has become my hobby!
Dec 16, 2013
I cleaned up the drivers side battery compartment which showed signs of a battery acid leak (years ago). I cleaned up and neutralized the residue then touched up the paint (brush on Rustoleum)

First job was cleaning the underside of the car (engine and transmission) and the engine bay. There were signs of oil leaks all over the place and everything was absolutely filthy. I started by scraping the oily grime away with plastic scrapers then progressed to rags and WD40. Valve cover gaskets looked to have been leaking for years!
The first real job I tackled was the PS fluid leak as this was quite bad. It looked to be confined to just the low pressure hoses and fittings - I replaced them all. The PS fluid reservoir was removed cleaned and rebuilt with a new filter. The 2 high pressure hoses in the system appear to be OK and show no signs of leaking. These 2 hoses are very expensive to replace so I have not do anything with them for the time being. One of them (the short one) looks like it might have been replaced already. The other (which costs about $350) looks to be original.
2 new hoses installed on the PS cooler (radiator). These were a bit tricky to get to but I found a way.

This is the area surrounding the PS fluid reservoir which was oil soaked and absolutely filthy. I spent the better part of a day cleaning just this area.

This is the PS fluid reservoir and some hoses (old and new). I only had to buy one preassembled hose, the rest of them were cut from bulk hose which saves a few bucks.

There is a filter inside the reservoir which is often overlooked. I replaced it with a new one and end seals (which were missing).

I had planned to replace just the power steering hoses but decided I should rebuild the brake booster as well since it's seals often fail. Unlike most cars which use a vacuum assisted brake booster, this car uses a hydraulic brake booster that is fed with high pressure fluid from the power steering system. It is very common for the booster in this car to leak, the result of old/deteriorating o-rings and seals. Fortunately, there is a rebuild kit available from Max Lumens for $100 which I purchased.

12/21/13
The underside is starting to look a little cleaner now. I've spent about 3 days under there but you can see below that there is still lots more cleaning to do! it's messy work as bits of oily grime fall off the car and get everywhere. I used my shop vac to clean a lot of it but it sticks to the sides of the vacuum hose and nozzle and generally makes a mess of the shop vac which I later had to clean up with mineral spirits!
I can now see that the transmission is leaking a little - it looks to be the pan gasket (an easy fix) and possibly the seal on the shifter shaft (not easy to fix). The front of the engine is still very dirty - timing case gaskets may be leaking a little but I think most has run down from the valve covers. I'm not seeing much engine oil leaking since cleanup but that may well change once the engine is running and warmed up.
I installed new engine mounts. The old ones were intact but about 1/4" short (compressed) and rock hard. The new ones are soft and should help isolate any engine vibration. The transmission mounts look like they have already been replaced (most likely when the drive shaft was replaced) so I will leave those for now. The engine ground strap has seen better days so I will replace it (it's not installed in the pic below). It carries a lot of current to the starter motor and is just a simple crimp cable (the insulation is falling off).

When I removed the water valve and aux pump to get to the brake booster the hose fittings on the aux pump broke (one was already broken and the hose clamp moved to the end of the hose. I purchased a new pump ($100) which is now attached to the water valve (below). I later replaced the water valve as well even though the old one checks out ok.

I was expecting the water valve to be bad as it does look quite old but both valves work perfectly! Testing it was very easy.... with no power applied you can blow into the common port and air will come out of both exits. Energizing either valve will shut off the air flow to that port. This valve controls the flow of hot engine coolant into the heater cores inside the car (one valve for driver side and the other for passenger side heaters). These valves often go bad allowing hot water to enter the heater core at all times which is not a good thing in the summer! Update 5/20/15; I found a brand new valve on Ebay for $100 shipped so I replaced this one.

I will be pulling the valve covers to check the banjo bolts and head bolts as both have a tendency to work loose or break on this car. This will also make replacing all of the engine compartment hoses and vacuum lines a lot easier; most of which have hardened and become brittle. I will also be cleaning everything as it is very dirty. I also plan to spruce up the intake manifolds and valve covers with new paint.
Disassembly begins...

Here is the oily mess I am starting with (DK's removed)...

There was fuel in the vacuum lines from the DK's to the fuel pressure regulators (FPR) so the FPR's appear bad and will be replaced. You can also see the cracked sheathing on the wiring harness which has become hard and brittle (fortunately the wires inside are still in good shape).

Cheap (OEM) paper gaskets on the intake manifold!

The DK's (Motorized throttle bodies) are out and cleaned. One appears to have been serviced already as some of the tamper proof screws have been swapped out and upon testing it works perfectly.
This one looks nice and clean on top...
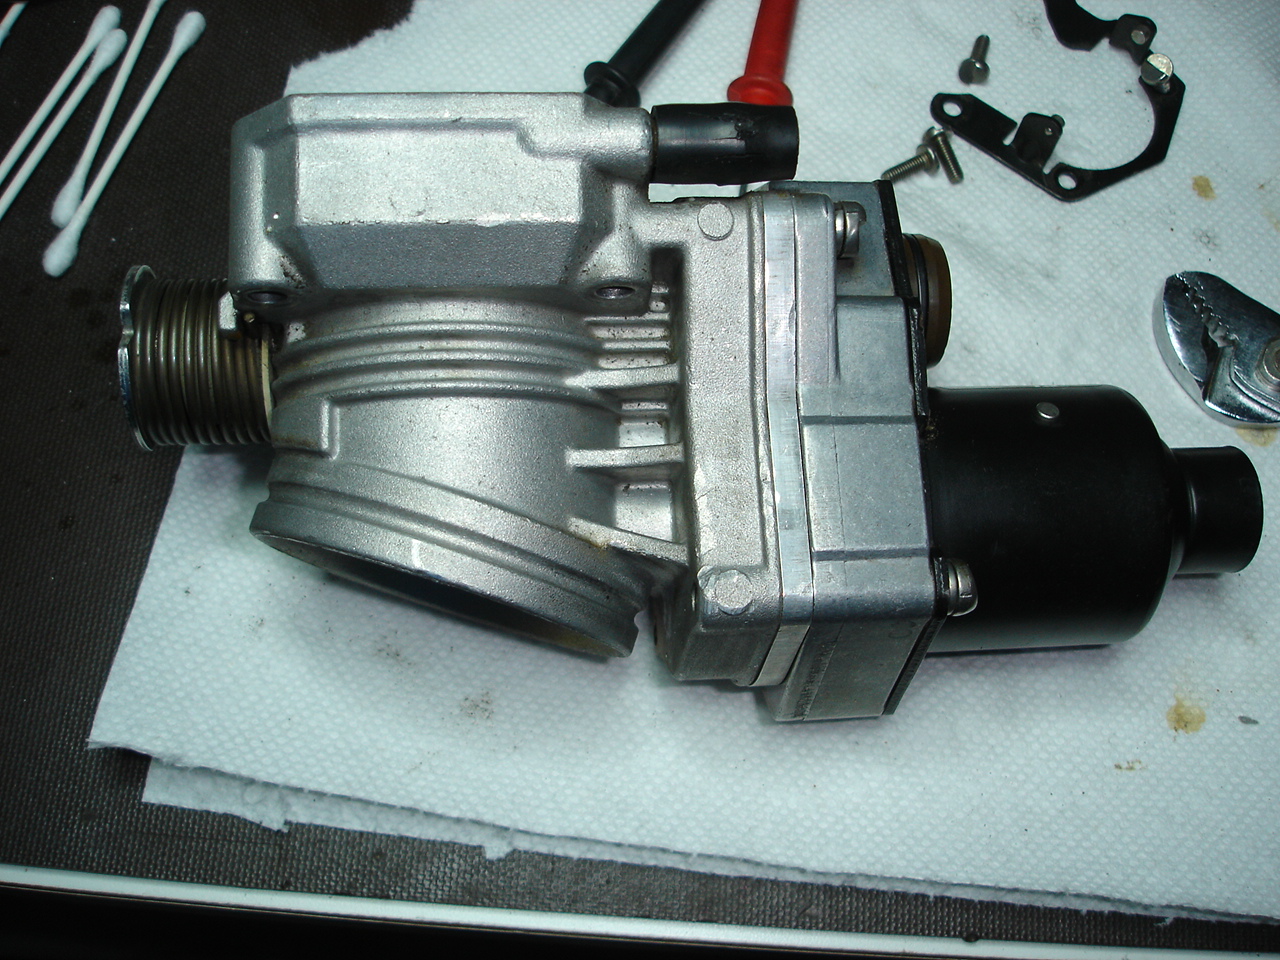
but it still has Cosmolene underneath! Since it is out of sight so I won't bother to clean it off. The only thing I found that will remove this stuff is paint stripper.


To test these DK's, power is applied to P3 (+ve) and P5 (-ve) from a bench power supply. I increased the voltage from zero to about 4V and it then slowly opens. A rheostat inside the unit reports the position of the valve. When the voltage is turned back down to zero it will close itself (return spring on outside of unit).
The bad unit sticks open sometimes which made cleaning it easy but could be quite disastrous while driving!
These are the resistance values I measured between pins 6 and 8 (position rheostat):
| Closed (no power) | Fully open | |
| Driver side DK | 2936 ohms | 1138 ohms |
| Passenger side DK | 3379 ohms | 1105 ohms |
I also checked the resistance between P1 and P7. It should be about 2K ohm when the DK valve is closed and goes open circuit as soon as the DK valve opens.
This one (passenger side) sticks and is being dismantled for repair. Note the tamper proof hardware that was swapped out for stainless Allen head screws. You can remove the tamper screws with a set of vice grips.


There was a lot of crud inside both of them (both were serviced) from the brushes which was cleaned up. There is still plenty of life left in the brushes so no need to replace them.
This device is nothing more than a geared down DC motor fighting a spring. The motor turns and opens the butterfly. Remove power from the motor and the spring closes the butterfly.
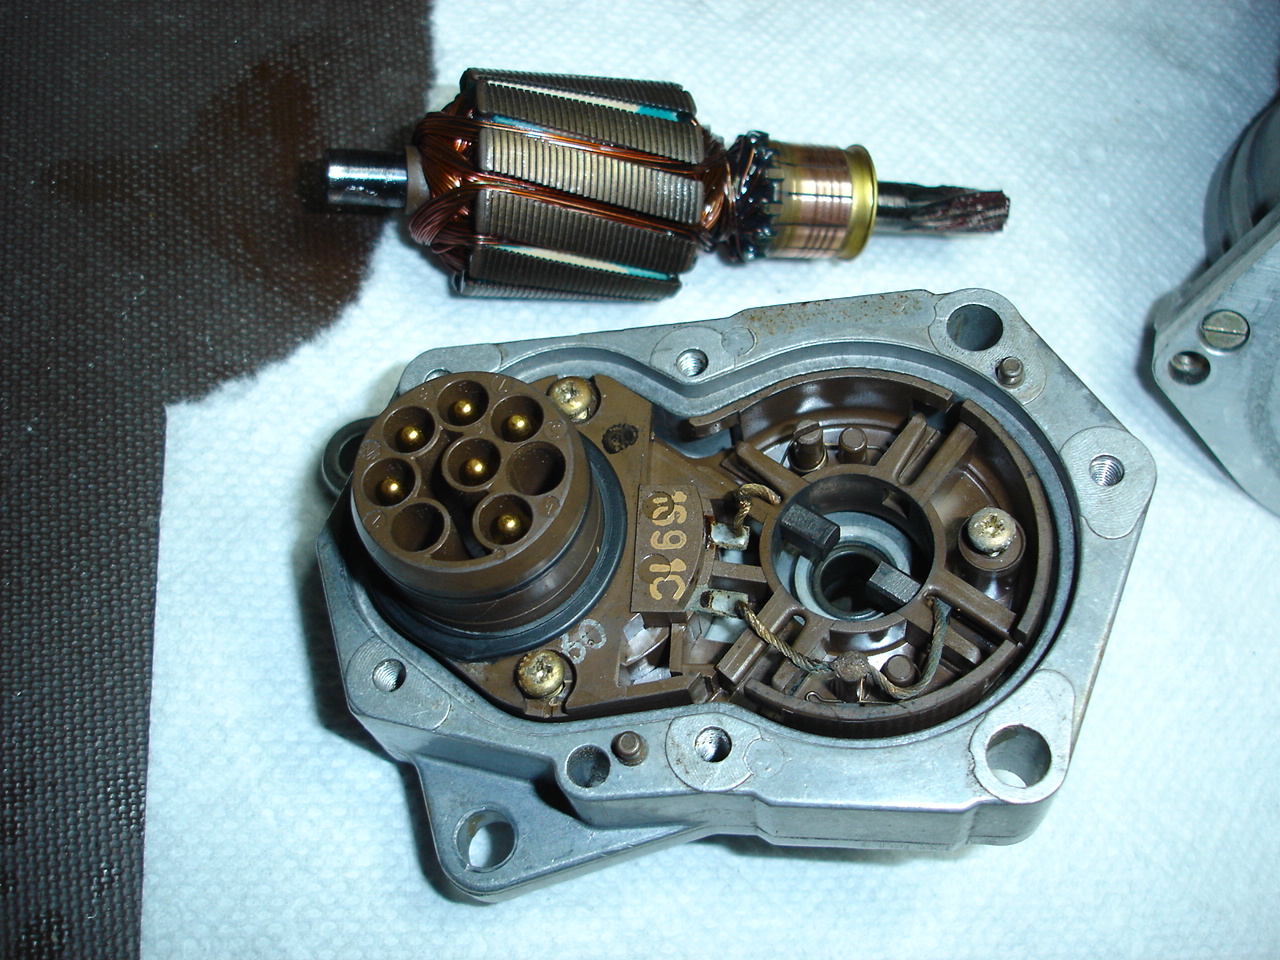
Fixed magnets in the motor housing

Contacts for the Rheostat and the reduction gears

The Rheostat I cleaned gently with a Q-tip but with no chemical for fear of removing the resistive track. The gears all get fresh white lithium grease.

The brushes should be pushed back in the housing before re-installing the motor.

Once installed you can push the brushes back into place. Make sure the retaining springs are seated in the groove at the back of each brush.
If you press your fingers against the gear on the end of the motor when you re-install the magnetic cover you will prevent the motor being sucked up by the magnets and possibly damaging the brushes. Put a dab of lithium grease on the motor bearing surfaces when re-assembling.

If you want to remove/re-install the return spring (I usually do), here's how I do it. Expect the cap on the end of the spring to be difficult to remove as it is a very tight fit.

Temporarily back together and works much better now. Resistance values are exactly as they were (a good sign). The valves now open with about 3V applied.

And here they are all finished... both cleaned, re-lubed and with new stainless hardware.

Here is a test sheet I made with a schematic of the DKM and results. These are from another set I restored (latest version they made). The values of the resistances are not very critical (note the wide tolerance). The only thing that really matters is the voltage on P6 which should be continuous and about 1V when the butterfly is fully open.

And the results below are from the DKM's removed from my spare engine. You can see the resistance values are not as consistent as the set above but the voltage at Pin 6 (which is all that really counts) is excellent.

The BMW (M70) engine was the first to employ 'drive by wire'..... there is no direct connection between the accelerator pedal and throttle bodies, instead they are connected via computer.